kirra-docs
Mesh Editing & Clean Mesh
Kirra provides interactive mesh editing and automated mesh repair tools for loaded surfaces.
 The Clean Mesh dialog showing diagnostics and repair tools for surface mesh quality.
Mesh Edit Tool (Edit Mesh)
The Mesh Edit workflow edits triangulated surfaces you already have in Kirra (DTM/STR, OBJ without live texture-only path, generated meshes, etc.). It runs only in the 3D view and opens a dockable FloatingDialog titled Mesh Edit with a compact toolbar (~700×170 px) plus an inline progress strip while the mesh is indexed.
Implementation: src/tools/MeshEditTool.js — exposes window.startMeshEditMode(surfaceId) and window.cancelMeshEditMode().
Requirements and limits
| Rule | Detail |
|---|---|
| 3D view | If Three.js is not initialised, Kirra prompts you to switch to 3D. |
| Surface must have triangles | Empty surfaces cannot be opened in mesh edit. |
| Textured OBJ workflow | Textured OBJ meshes (isTexturedMesh with threeJSMesh) are not supported for mesh edit — use non-textured triangulated surfaces or convert workflow accordingly. |
| One surface at a time | Starting mesh edit on another surface cancels the previous session. |
| Persistence | Structural edits trigger saveSurfaceToDB and surface cache invalidation; the TreeView refreshes after heavy operations. |
How to start
- Surface toolbar — Use the Mesh Edit tool (
ToolManageridmeshEditTool/ elementmeshEditTool), or - Clean Mesh dialog — Click Edit Mesh to jump straight into mesh edit for that surface (
CleanMeshDialog.js).
On start, Kirra builds a triangle soup, maps Three.js faces ↔ surface triangle indices, optional wireframe, vertex→triangle spatial index, and hover/selection overlays. Large meshes show a short loading progress (building index map, wireframe, overlays).
Selection modes
| Mode | Shortcut | Picking | Multi-select |
|---|---|---|---|
| Face | F (when no sub-mode) | Raycast on the surface mesh — click a triangle | Shift+click toggles faces in the selection set |
| Vertex | V | Screen-space nearest vertex within ~20 px (magenta points) | Shift+click toggles vertices |
Escape — First clears an active sub-mode; then clears face or vertex selection; if nothing is selected, exits Mesh Edit entirely (same as Close on the dialog).
Ctrl+A (Cmd+A on macOS) — Select all faces (face mode) or all unique vertices (vertex mode).
Toolbar actions (left to right)
| Control | What it does |
|---|---|
| Face / Vertex | Switches between triangle picking and vertex picking (see shortcuts F / V). |
| Delete | Face mode: removes selected triangles (and prunes orphaned points so 2D snap does not see ghosts). Vertex mode: deletes every triangle that uses any selected vertex. Uses UndoManager for undo/redo. |
| Invert | Swaps two corners of each selected triangle (winding / normal flip) for those faces only. |
| Weld | Vertex mode only, 2+ vertices — merges selected positions to their centroid and rewires triangles (W). |
| Move | Vertex mode — M toggles move sub-mode: pick a vertex, then drag; motion is constrained to an adjacent plane derived from neighbour triangles. |
| Insert | I — Insert sub-mode: pick three positions in the 3D view (raycast on mesh); Enter commits a new triangle when three picks are stored. |
| Polygon select | P — Draw a 2D screen-space polygon over the viewport; on completion, selects all triangles whose centres fall inside the polygon (face mode) or vertices inside (vertex mode). Shift+double-click to add to the existing selection. |
| Clean orphan vertices | Removes points entries not referenced by any triangle (scissors icon). |
| Selection count | Shows N face(s) or N vert(s). |
| Clear | Clears the current selection (faces or vertices). |
| Auto-repair | Checkbox — after delete, optionally runs boundary capping (capBoundaryLoopsSequential from mesh repair helpers) to seal open loops. |
| Normals | Checkbox — toggles normal arrows overlay (MeshLine) for inspection. |
| Open Edges | Checkbox — toggles pink fat-line overlay of boundary edges. |
Keyboard summary
| Key | Action |
|---|---|
| F / V | Face / Vertex mode (when not in a sub-mode) |
| Del / Backspace | Delete selected faces or all triangles touching selected vertices |
| Ctrl+A | Select all (faces or vertices) |
| W | Weld (vertex mode, 2+ verts) |
| M | Toggle move sub-mode (vertex mode) |
| I | Toggle insert-triangle sub-mode |
| P | Toggle polygon-select sub-mode |
| Enter | Confirm insert when three picks are ready |
| Escape | Exit sub-mode → clear selection → close Mesh Edit |
After editing
- Undo / Redo — Destructive edits are pushed to the global UndoManager (
DeleteTrianglesAction,InvertTrianglesAction,InsertTrianglesAction, etc.). - Close — The dialog Close button calls
cancelMeshEditMode(), which tears down overlays, listeners, and the floating toolbar.
For automated repair (degenerate tris, weld all, self-intersection removal), continue with Clean Mesh below.
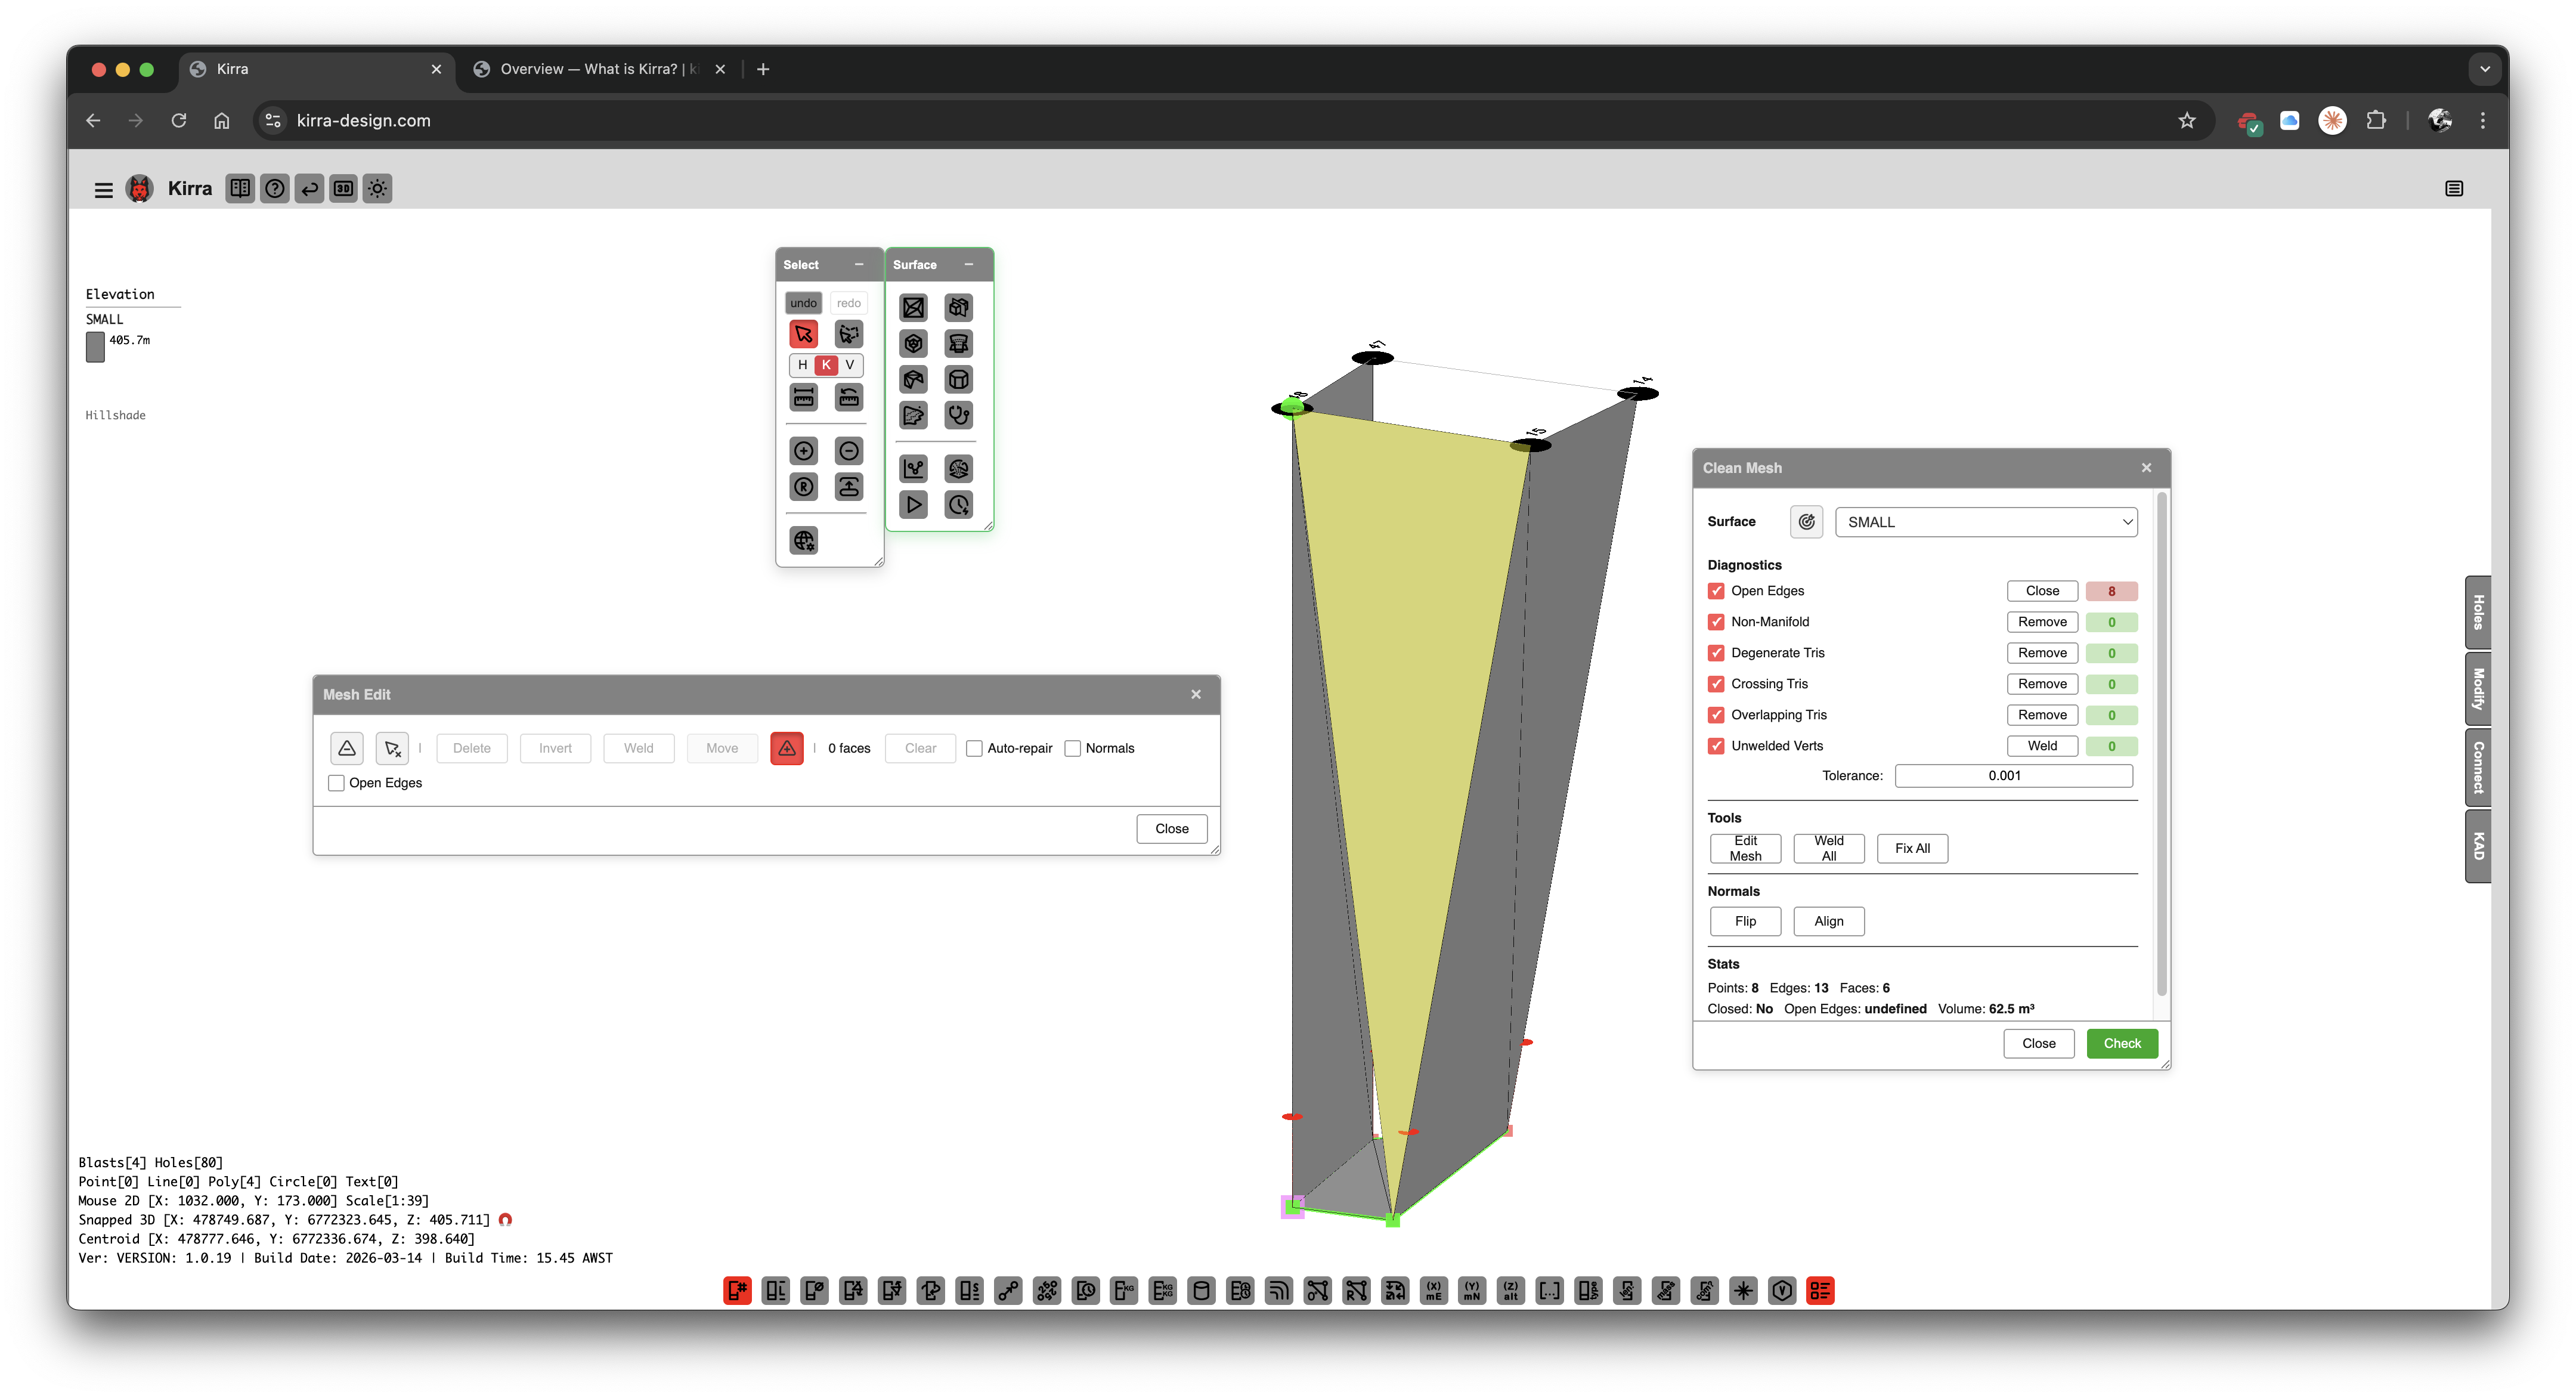
Clean Mesh
The Clean Mesh tool provides automated diagnostics and one-click repair for common mesh quality issues.
How to Access
Right-click a surface in the TreeView and select Clean Mesh.
Diagnostics
The dialog displays real-time statistics before and after each operation:
| Diagnostic | Description |
|---|---|
| Open Edges | Boundary edges not shared by two triangles |
| Non-Manifold | Edges shared by more than two triangles |
| Degenerate Tris | Zero-area or near-zero-area triangles |
| Crossing Tris | Triangles that intersect other triangles in the same surface |
| Overlapping Tris | Near-duplicate triangles with opposing normals |
| Unwelded Verts | Vertices within snap tolerance that should be merged |
Quick Fix Tools
| Tool | Description |
|---|---|
| Edit Mesh | Opens the interactive Mesh Edit tool |
| Weld All | Merges all vertices within snap tolerance |
| Fix All | Runs the full repair pipeline (degenerate removal, weld, crossing cleanup, overlap removal) |
Normal Controls
| Operation | Description |
|---|---|
| In | Set normals to point inward |
| Out | Set normals to point outward |
| Flip | Reverses winding order of all triangles |
| Align | Propagates consistent winding from a seed triangle across the mesh |
Normal controls are also available from the TreeView context menu (right-click a surface).
Individual Repair Operations
| Operation | Description |
|---|---|
| Remove Degenerate Triangles | Deletes zero-area and near-zero-area triangles |
| Remove Duplicate Triangles | Finds and removes triangles sharing the same vertices |
| Remove Self-Intersections | Detects and removes crossing triangles |
| Weld Vertices | Merges vertices within configurable tolerance |
| Remove Isolated Vertices | Cleans up orphaned vertices |
| Fix Winding Order | Ensures consistent triangle winding |
| Remove Sliver Triangles | Removes extremely thin triangles based on aspect ratio |
Typical Mesh Repair Workflow
- Import a surface
- Right-click in TreeView > Clean Mesh
- Review the diagnostics (open edges, non-manifold, degenerate, etc.)
- Click Fix All for automated repair, or address issues individually
- Use Align normals if lighting looks wrong
- Verify diagnostics show improved counts