kirra-docs
Holes Toolbar
The Holes toolbar provides tools for placing blast holes, generating patterns, renumbering, and managing charging on selected holes. It is one of the six floating toolbars on the right side of the Kirra workspace.
Toolbar Overview
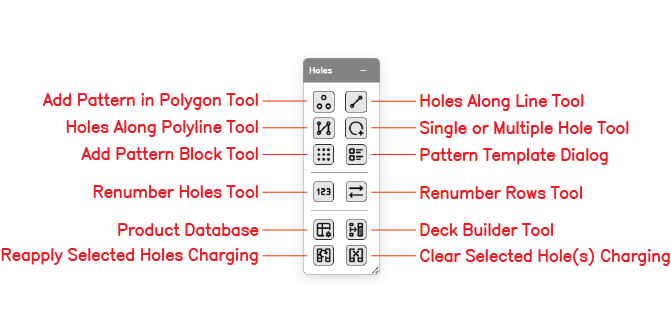 The Holes toolbar with all tool buttons labelled.
The Holes toolbar contains the following tools:
| Tool | Type | Description |
|---|---|---|
| Add Pattern in Polygon Tool | Interactive | Fill a polygon boundary with holes at a specified burden and spacing |
| Holes Along Line Tool | Interactive | Place holes along a straight line between two points |
| Holes Along Polyline Tool | Interactive | Place holes along a multi-segment polyline path |
| Single or Multiple Hole Tool | Interactive | Place individual holes by clicking on the canvas |
| Insert Holes Tool | Interactive | Insert one or more holes into an existing row, before or after a clicked hole, at the row spacing or a custom distance |
| Add Pattern Block Tool | Dialog | Generate a rectangular grid of holes with uniform burden and spacing |
| Pattern Template Dialog | Dialog | Open the template picker to apply a saved pattern configuration |
| Renumber Holes Tool | Dialog | Renumber the IDs of selected holes by a chosen sort order |
| Renumber Rows Tool | Dialog | Renumber holes by row |
| Product Database | Dialog | Open the explosive products database used by charging |
| Deck Builder Tool | Dialog | Open the deck builder to configure charge decks for selected holes |
| Reapply Selected Holes Charging | Action | Re-apply the current charge template to the selected holes |
| Clear Selected Hole(s) Charging | Action | Remove all charging data from the selected holes |
Add Pattern in Polygon Tool
Fills a polygon boundary with blast holes at a specified burden and spacing. Holes whose collar positions fall outside the polygon are automatically excluded. Use this tool for irregular blast boundaries, pit-edge shapes, and selective areas inside a larger bench.
[SCREENSHOT NEEDED: Add Pattern in Polygon dialog]
How to Use
- Click the Add Pattern in Polygon button on the Holes toolbar
- Define the polygon boundary by clicking points on the canvas, or select an existing KAD polygon [VERIFY: exact boundary-picking workflow]
- Enter burden and spacing
- Set collar elevation, bench height, subdrill, angle, bearing, diameter, and hole type
- Optionally enable stagger to offset every second row by half the spacing
- Click Generate [VERIFY: button label]
See Pattern Generation → Polygon Pattern for parameter detail.
Holes Along Line Tool
Places a single straight row of blast holes between two points. Useful for presplit lines, buffer rows, and single-row production blasts.
[SCREENSHOT NEEDED: Holes Along Line dialog]
How to Use
- Click the Holes Along Line button on the Holes toolbar
- Click the start and end points on the canvas, or enter coordinates
- Enter either the number of holes or the spacing between holes — the other value is calculated automatically
- Set collar elevation, bench height, subdrill, angle, bearing, diameter, and hole type
- Click Generate [VERIFY: button label]
See Pattern Generation → Line Pattern for use cases and typical spacings.
Holes Along Polyline Tool
Places holes along a multi-segment polyline path. Ideal for curved presplit lines, contour-following rows, and perimeter patterns that follow pit contours.
[SCREENSHOT NEEDED: Holes Along Polyline dialog]
How to Use
- Click the Holes Along Polyline button on the Holes toolbar
- Click points on the canvas to define the path, or select an existing polyline
- Enter the hole spacing along the path
- Set hole properties
- Click Generate [VERIFY: button label]
Bearing Options
| Option | Behaviour |
|---|---|
| Follow Path | Each hole is angled perpendicular to its local path segment |
| Fixed Bearing | All holes share the same bearing regardless of path direction |
See Pattern Generation → Polyline Pattern.
Single or Multiple Hole Tool
Places individual blast holes on the canvas by clicking. Each click places one hole using the current hole defaults and auto-increments the Hole ID.
How to Use
- Click the Single or Multiple Hole button on the Holes toolbar
- Configure the default properties in the Hole Defaults form (diameter, bench height, subdrill, angle, bearing, hole type)
- Click anywhere on the canvas to place a hole
- Continue clicking to place more holes
Tip: Hold
Shiftwhile clicking to snap to the active grid. [VERIFY: snap behaviour]
See Adding Blast Holes for the full default-property reference.
Insert Holes Tool
Inserts one or more holes into an existing row, before or after a hole you click — at the row spacing or a custom distance. Unlike the Single Hole tool (which drops standalone holes), Insert Holes works on the clicked hole’s row: the new holes take their place in the row and the existing holes shift their position numbers outward (a gap that fits three holes takes three, pushing the rest along the row). New holes inherit the clicked hole’s properties (diameter, length, type, bench, angle, bearing, colour) and the row is auto-renumbered.
The dialog is persistent — it stays open so you can click hole after hole.
How to Use
- Click the Insert Holes button on the Holes toolbar. The select pointer and hole mode are turned on automatically, and a small dialog opens.
- Set:
- Number of holes — how many to insert per click.
- Insert — After or Before the clicked hole.
- Distance — Use the row spacing (the clicked hole’s spacing), or Custom distance in metres.
- Click a hole on the canvas. The new holes are inserted along the row in the chosen direction.
- Click another hole to repeat. Click Close (or toggle the button off) when finished.
Duplicate protection
If an inserted hole would land on top of another hole in the same blast, Kirra shows a coincidence warning before committing — you can Ignore (insert anyway), Skip (insert only the non-clashing holes), or Cancel. This is the same same-blast XY check every hole tool uses (see Editing Holes → Hole coincidence).
Add Pattern Block Tool
Generates a rectangular grid of blast holes with uniform burden and spacing. This is the most common pattern type for bench blasting.
[SCREENSHOT NEEDED: Add Pattern Block dialog]
How to Use
- Click the Add Pattern Block button on the Holes toolbar
- Enter the pattern name, number of rows, and number of columns
- Enter burden, spacing, and the starting position (Easting, Northing, Elevation)
- Set bench height, subdrill, angle, bearing, diameter, and hole type
- Click Generate [VERIFY: button label]
See Pattern Generation → Rectangular Grid for the complete parameter list.
Pattern Template Dialog
Opens the pattern-template picker. Templates save burden, spacing, hole properties, and charging so you can apply a familiar pattern configuration quickly.
[SCREENSHOT NEEDED: Pattern Template dialog]
How to Use
- Click the Pattern Template button on the Holes toolbar
- Select a saved template from the list
- Adjust any parameters as needed
- Apply the template [VERIFY: exact apply-button label]
See Pattern Templates for creating, saving, and managing templates.
Renumber Holes Tool
Renumbers the IDs of selected holes by a chosen sort order. Timing connections and charging references are updated to match the new IDs.
[SCREENSHOT NEEDED: Renumber Holes dialog]
How to Use
- Select the holes to renumber (or press
Ctrl+Afor all holes) [VERIFY: Ctrl+A select-all] - Click the Renumber Holes button on the Holes toolbar
- Enter a prefix, start number, and sort order (by row, by easting, by northing, or by current number) [VERIFY: exact sort options]
- Click Apply [VERIFY: button label]
Renumber Rows Tool
Renumbers holes by row. Useful when automatic row clustering has been applied but the row numbering order needs to change (for example, reversing the direction of firing).
[SCREENSHOT NEEDED: Renumber Rows dialog]
How to Use
- Select the holes to renumber
- Click the Renumber Rows button on the Holes toolbar
- Configure the row numbering order [VERIFY: available options]
- Click Apply [VERIFY: button label]
Product Database
Opens the explosive products database. This is the source of the products available in the Deck Builder and in CSV charging imports.
[SCREENSHOT NEEDED: Product Database dialog]
See Product Database CSV for the data format and import/export workflow.
Deck Builder Tool
Opens the Deck Builder dialog to configure charge decks — stemming, explosives, spacers, and primers — for the selected holes.
[SCREENSHOT NEEDED: Deck Builder dialog]
How to Use
- Select the holes to charge
- Click the Deck Builder button on the Holes toolbar
- Configure the deck structure
- Apply the configuration to the selected holes [VERIFY: apply workflow]
See Deck Builder for the full configuration reference.
Reapply Selected Holes Charging
Re-applies the current charge template to the selected holes. Use this after changing hole geometry (length, bench height, subdrill) so the deck lengths and product masses recalculate.
How to Use
- Select the holes to reapply charging to
- Click the Reapply Selected Holes Charging button on the Holes toolbar
- The current deck configuration is re-run against each selected hole [VERIFY: behaviour when no charge template is active]
Clear Selected Hole(s) Charging
Removes all charging data — decks, products, and mass values — from the selected holes.
How to Use
- Select the holes to clear
- Click the Clear Selected Hole(s) Charging button on the Holes toolbar
- All deck assignments on the selected holes are removed [VERIFY: whether a confirmation prompt appears]
Note: This operation can be undone with
Ctrl+Z. [VERIFY]
Related Topics
- Adding Blast Holes — hole defaults and manual placement
- Pattern Generation — parameter reference for each pattern type
- Pattern Templates — save and reuse pattern configurations
- Deck Builder — charge column configuration
- Interface Tour — workspace overview
- Modify Toolbar — transform, offset, radii, boolean, and related tools