kirra-docs
Interface Tour
This page walks through the Kirra workspace — the top app navigation bar, the side navigation panel, floating toolbars, viewport, and overlays — so you can find what you need quickly.
App Navigation Bar
The bar across the top of the window holds the global navigation controls — a left-side cluster of app buttons and a right-side cluster of panel toggles.
 Full-width App Navigation Bar — left cluster holds app and view controls; right cluster toggles the Data Explorer and File Manager panels.
Left cluster (left to right)
| Button | Purpose |
|---|---|
| ☰ Hamburger | Opens the Left Sidenav — File Management, Print, +/- Holes, Edit Holes, Record Actuals, View Controls & Snap, About |
| 🐕 Kirra | App identity (no action on click) |
| 📖 Book | Language select — pick the UI language |
| ? Help | Open help |
| ↻ Reset / Reload | Reset or reload the current project state |
| ↩ Back | Navigate back to blastingapps.com (external) |
| ▦ Toolbar Reset | Reset every floating toolbar to its default dock position. Use this if a toolbar has been dragged off-screen or you want a clean layout |
| 2D / 3D | Toggle between 2D plan view and 3D viewport. The button is highlighted blue when 2D is active |
| ☀ Day / Night | Toggle day (light) / night (dark) theme. The button is highlighted red/orange when active |
Right cluster (left to right)
| Button | Purpose |
|---|---|
| 📑 Data Explorer | Toggle the Data Explorer (TreeView) panel |
| 📁 File Explorer | Open the OS file explorer at the project location — Tauri desktop build only (not available in the browser build) |
[SCREENSHOT NEEDED: hamburger menu expanded so the side-panel sections can be confirmed.]
Side App Navigation Panel
Opened from the ☰ Hamburger button. The panel is a vertical stack of collapsible groups — each red header expands / collapses with the − / + indicator.
 The App Navigation panel — File Management, Print Management, hole tools, View Controls & Snap (expanded), and About.
File Management
| Control | Purpose |
|---|---|
| Import (icon button) | Open the Import dialog (see File Manager — Import Dialog below) |
| Export (icon button) | Open the Export dialog [VERIFY: identical layout to Import?] |
Print Management
| Control | Purpose |
|---|---|
| Print Files | Listed under the section header |
| Print Dialog: Show or Hide (icon button) | Toggle the PDF Print dialog (see Print Dialog below) |
+ or - Holes
Collapsible group for placing and removing holes. Expand to reveal the hole-placement controls. [VERIFY: full list when expanded]
Edit Holes
Collapsible group for editing properties of existing holes. [VERIFY: full list when expanded]
Record Actuals
Collapsible group for recording as-drilled / as-built actuals against the design holes. [VERIFY: full controls when expanded]
View Controls & Snap
The largest group — global display and snap settings. The screenshot shows it expanded with sliders for every control.
| Control | Default shown | Purpose |
|---|---|---|
| Font Size | 16.0px | Size of labels rendered in the viewport |
| Font Size Locked? | checked | When ticked, font size does not auto-scale with zoom |
| Tie Size (units) | 3.0 | Size of tie/connector glyphs [VERIFY: unit meaning] |
| Toe Size (m) | 0.0m | Toe marker size in metres |
| Hole Adjust (units) | 2.0 | Hole-marker visual adjustment [VERIFY] |
| Interval (ms) | 100ms | Time interval used for the simple blast animation playback step |
| First Movement Size (units) | 2.0 | First-movement arrow size |
| Snap Tolerance | 10px | Pixel radius for snap-to-vertex / snap-to-hole |
| Hillshade Light Bearing (deg) | 135° | Compass bearing of the hillshade light (0 = N, clockwise) |
| Hillshade Light Elevation (deg) | 15° | Elevation of the hillshade light above the horizon |
| Surface Colour Gradient Style | Radial | Gradient style for surface elevation colouring (dropdown) |
About
Collapsible group at the bottom — opens the About card with version, build, and licence information.
File Manager — Import Dialog
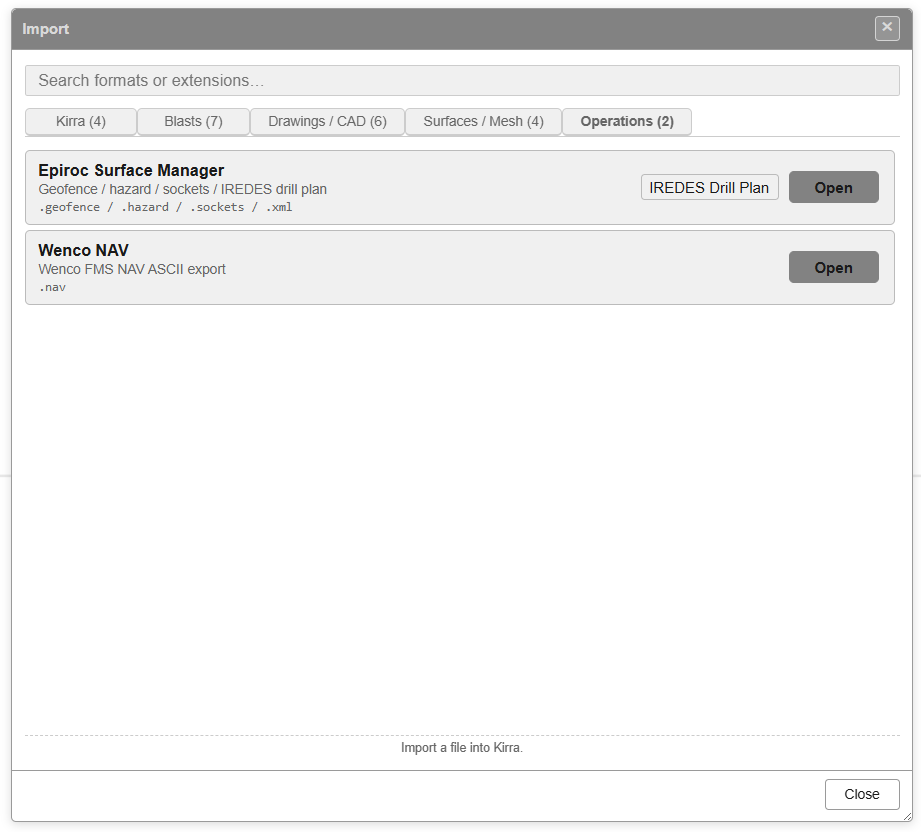
Opened from the Import button in the side panel’s File Management group.
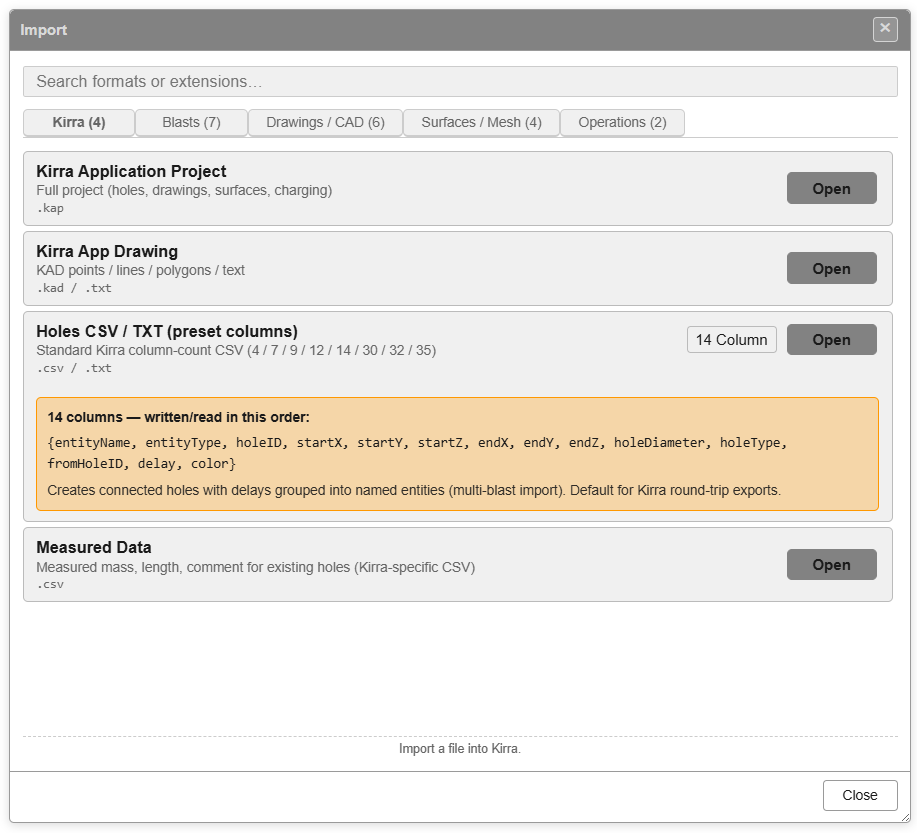 Import dialog, Kirra tab — KAP, KAD, Holes CSV/TXT (with column-count dropdown), Measured Data.
The dialog is tabbed by file family. The counts in parentheses are the format counts on each tab.
| Tab | Counts | Formats |
|---|---|---|
| Kirra | 4 | KAP project, KAD drawing, Holes CSV/TXT, Measured Data |
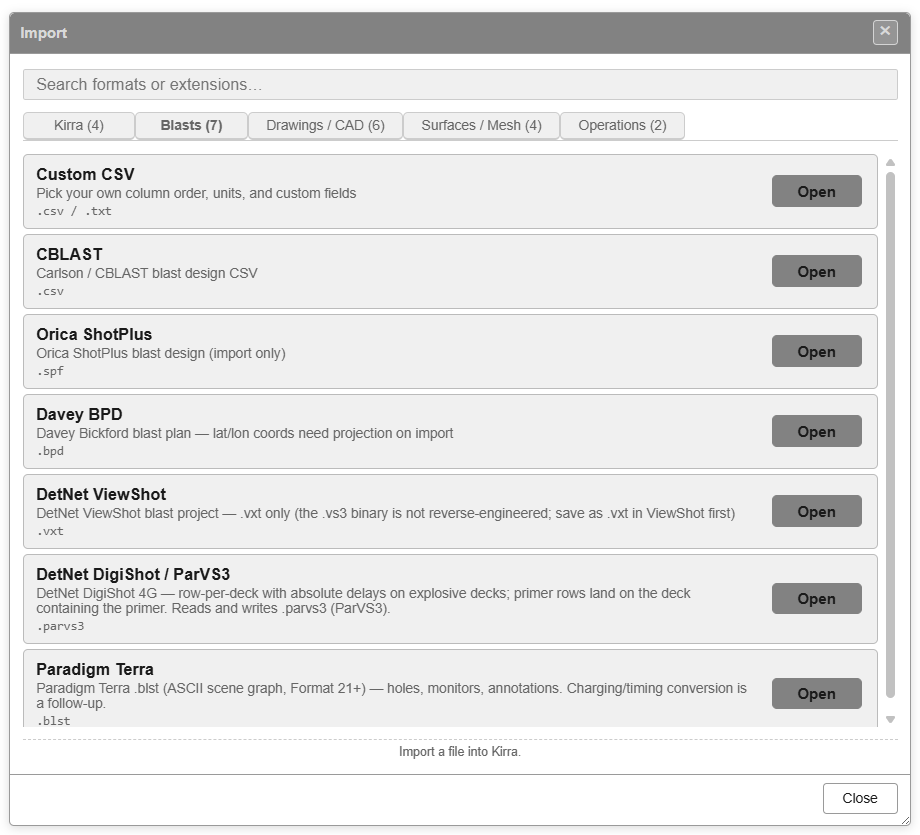
| Blasts | 7 | Custom CSV, CBLAST, Orica ShotPlus (.spf), Davey BPD, DetNet ViewShot (.vxt), DetNet DigiShot/ParVS3, Paradigm Terra |
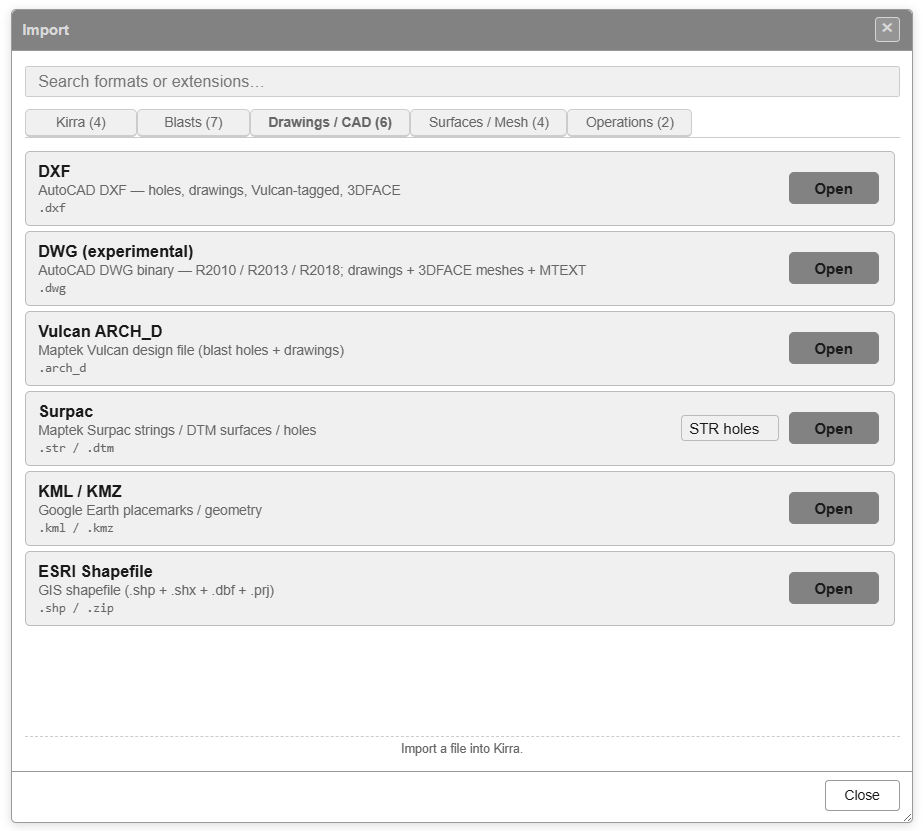
| Drawings / CAD | 6 | DXF, DWG (experimental), Vulcan ARCH_D, Surpac (STR/DTM), KML/KMZ, ESRI Shapefile |
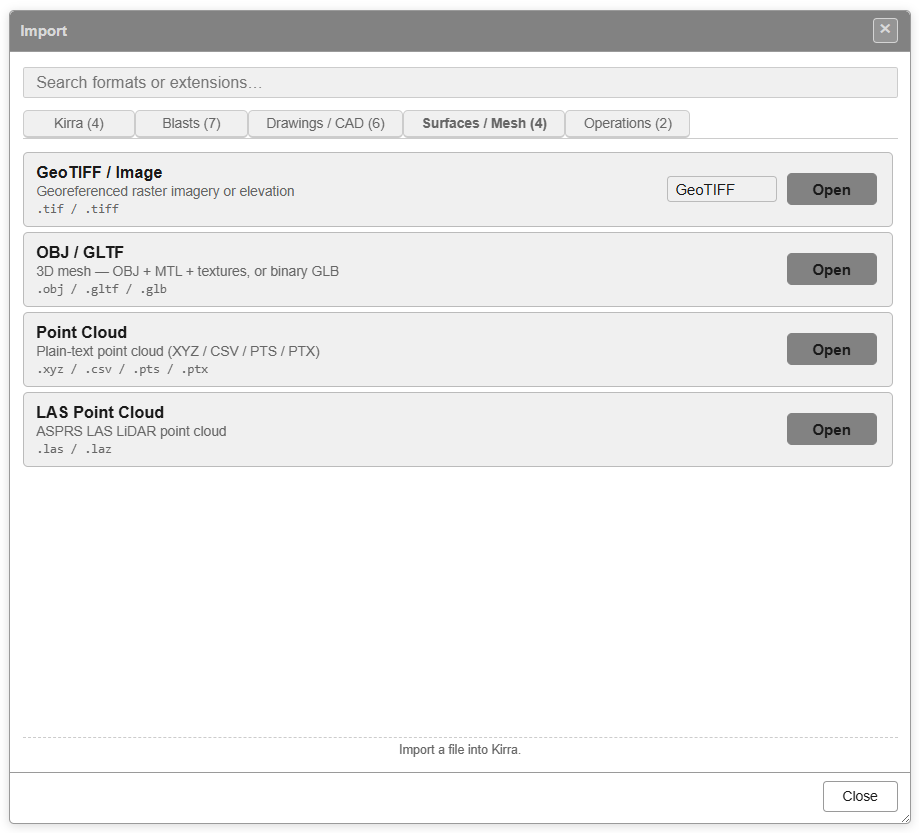
| Surfaces / Mesh | 4 | GeoTIFF/Image, OBJ/GLTF, Point Cloud (XYZ/CSV/PTS/PTX), LAS Point Cloud |
| Operations | 2 | Epiroc Surface Manager, Wenco NAV |
Shared controls
| Control | Purpose |
|---|---|
| Search formats or extensions… | Filter the list across all tabs by name or extension |
| Open (per row) | Pick a file of that format |
| Close (footer) | Close the dialog |
Kirra tab
| Format | Extensions | Notes |
|---|---|---|
| Kirra Application Project | .kap |
Full project (holes, drawings, surfaces, charging) |
| Kirra App Drawing | .kad / .txt |
KAD points / lines / polygons / text |
| Holes CSV / TXT (preset columns) | .csv / .txt |
Standard Kirra column-count CSV — 4 / 7 / 9 / 12 / 14 / 30 / 32 / 35 columns (pick from dropdown). 14-column is the default round-trip format: {entityName, entityType, holeID, startX, startY, startZ, endX, endY, endZ, holeDiameter, holeType, fromHoleID, delay, color} |
| Measured Data | .csv |
Measured mass, length, comment for existing holes |
Blasts tab
| Format | Extensions | Notes |
|---|---|---|
| Custom CSV | .csv / .txt |
Pick your own column order, units, and custom fields |
| CBLAST | .csv |
Carlson / CBLAST blast design CSV |
| Orica ShotPlus | .spf |
Orica ShotPlus blast design (import only) |
| Davey BPD | .bpd |
Davey Bickford blast plan — lat/lon coords need projection on import |
| DetNet ViewShot | .vxt |
DetNet ViewShot blast project — .vxt only (the .vs3 binary is not reverse-engineered; save as .vxt in ViewShot first) |
| DetNet DigiShot / ParVS3 | .parvs3 |
Row-per-deck with absolute delays on explosive decks; primer rows land on the deck containing the primer. Reads and writes .parvs3 (ParVS3) |
| Paradigm Terra | .blst |
Paradigm Terra .blst (ASCII scene graph, Format 21+) — holes, monitors, annotations. Charging/timing conversion is a follow-up |
Drawings / CAD tab
| Format | Extensions | Notes |
|---|---|---|
| DXF | .dxf |
AutoCAD DXF — holes, drawings, Vulcan-tagged, 3DFACE |
| DWG (experimental) | .dwg |
AutoCAD DWG binary — R2010 / R2013 / R2018; drawings + 3DFACE meshes + MTEXT |
| Vulcan ARCH_D | .arch_d |
Maptek Vulcan design file (blast holes + drawings) |
| Surpac | .str / .dtm |
Maptek Surpac strings / DTM surfaces / holes — STR holes mode is selected via the dropdown |
| KML / KMZ | .kml / .kmz |
Google Earth placemarks / geometry |
| ESRI Shapefile | .shp / .zip |
GIS shapefile (.shp + .shx + .dbf + .prj) |
Surfaces / Mesh tab
| Format | Extensions | Notes |
|---|---|---|
| GeoTIFF / Image | .tif / .tiff |
Georeferenced raster imagery or elevation. The row shows a GeoTIFF mode dropdown |
| OBJ / GLTF | .obj / .gltf / .glb |
3D mesh — OBJ + MTL + textures, or binary GLB |
| Point Cloud | .xyz / .csv / .pts / .ptx |
Plain-text point cloud |
| LAS Point Cloud | .las / .laz |
ASPRS LAS LiDAR point cloud |
Operations tab
| Format | Extensions | Notes |
|---|---|---|
| Epiroc Surface Manager | .geofence / .hazard / .sockets / .xml |
Geofence / hazard / sockets / IREDES drill plan — row shows an IREDES Drill Plan mode dropdown |
| Wenco NAV | .nav |
Wenco FMS NAV ASCII export |
See Supported File Formats for the full import / export matrix and round-trip notes.
Print Dialog
Opened from Print Dialog: Show or Hide in the side panel’s Print Management group.
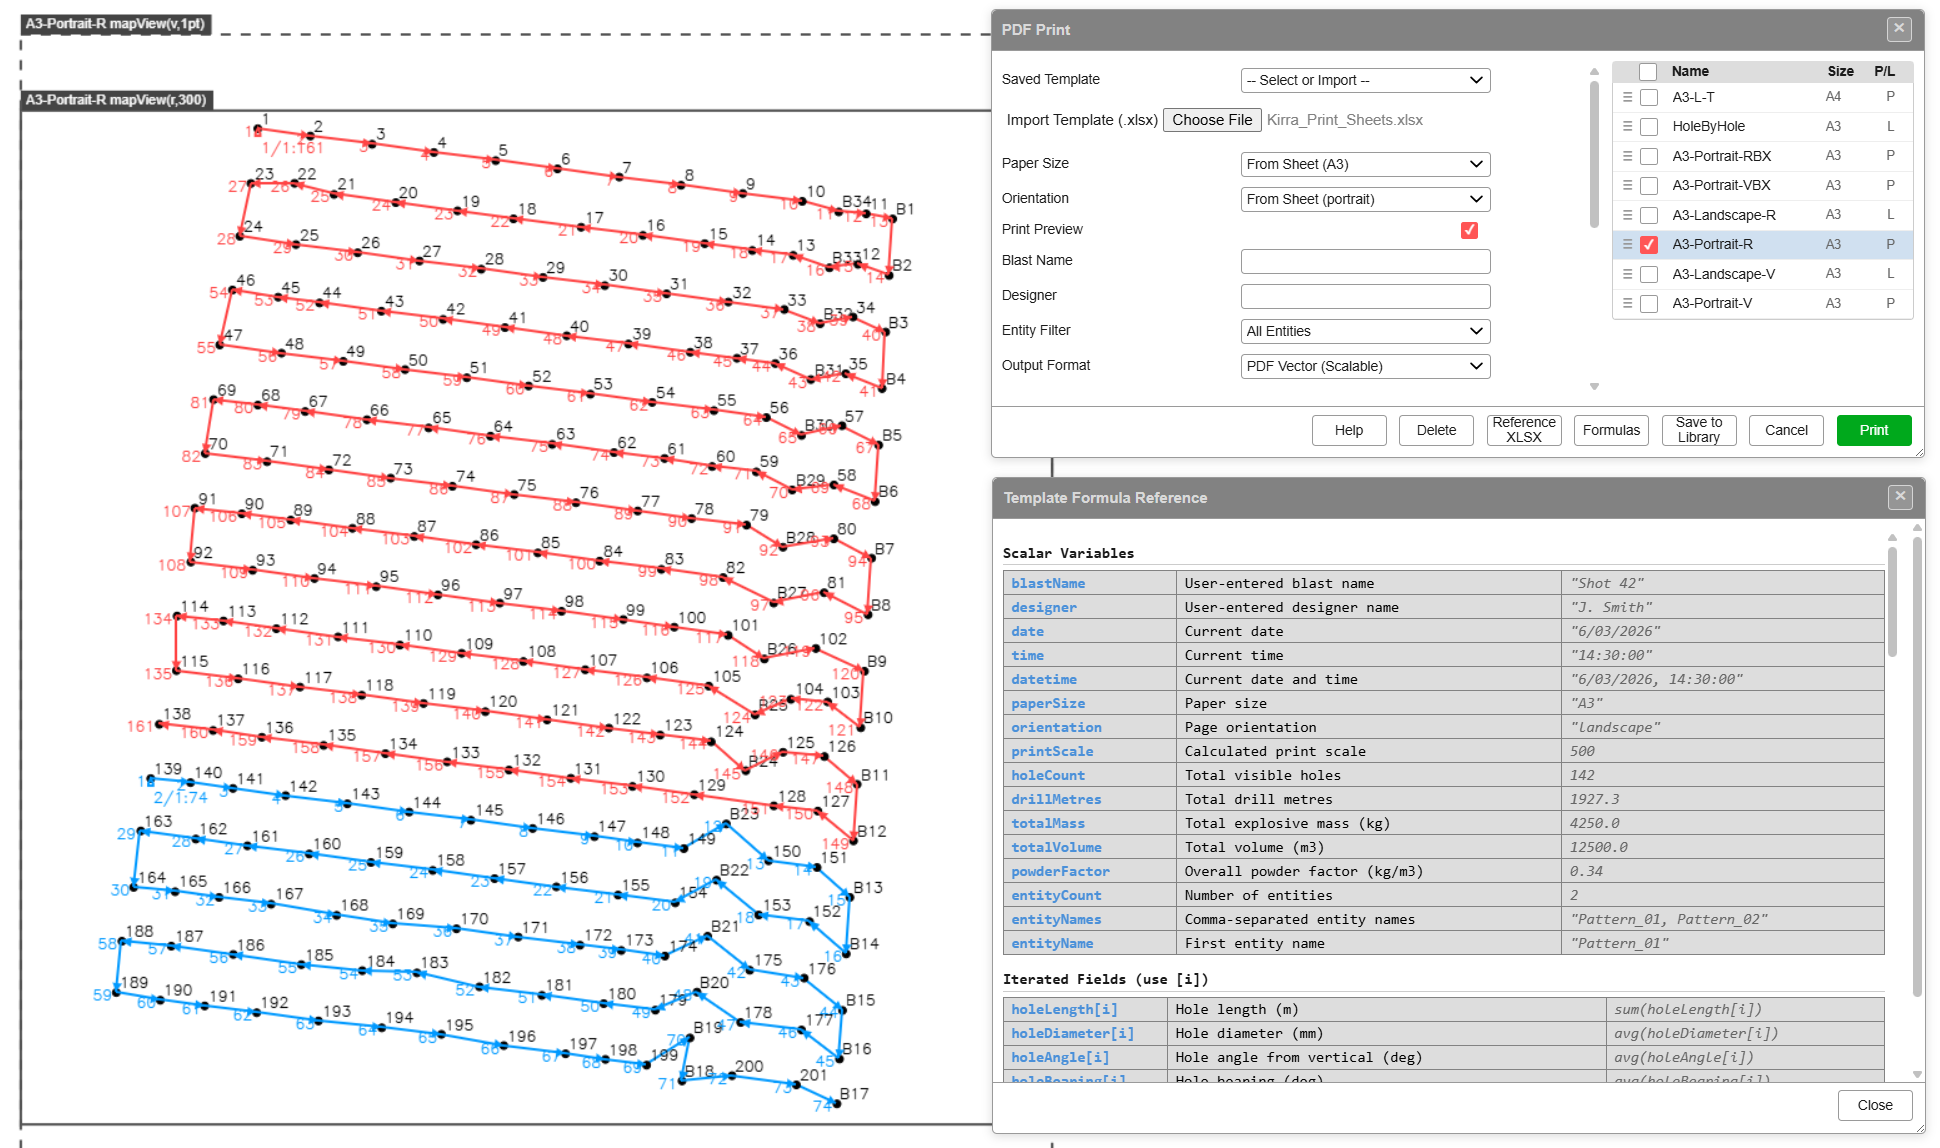 PDF Print dialog (right) over the 2D viewport (left). The lower right panel shows the Template Formulas Reference.
PDF Print controls
| Control | Purpose |
|---|---|
| Saved Templates | Dropdown of templates saved to the library |
| Import Template | Load a template file (XLSX) — file picker labelled Choose File |
| Paper Size | Paper size dropdown — selection from the loaded template [VERIFY: dropdown options] |
| Orientation | From sheet (or override) [VERIFY] |
| Print Preview | Toggle preview rendering |
| Sheet Name | Free-text field for the printed sheet name |
| Designer | Free-text field for the designer’s name |
| Output Format | PDF Vector (default) or other output formats [VERIFY: full list] |
Footer buttons
| Button | Action |
|---|---|
| Help | Open help / documentation for the print system |
| Reset | Reset all fields to template defaults |
| Reference | Toggle the Template Formulas Reference panel |
| Formulas | Insert formula at cursor [VERIFY: button behaviour] |
| Save to Library | Save current settings as a new template |
| Generate the PDF |
Template Formulas Reference
A panel listing every formula variable available in XLSX templates. Two sections:
- Scalar variables — single-value fields like
blastName,designer,date,time,scaleFromUI,paperSize,paperOrientation, plus geometric scalars - Iterated fields — per-hole / per-deck fields (e.g.
holeLength,holeAngle, etc.) that iterate when used inside a repeating template region
See Print to PDF and Print from Template (XLSX) for the full workflow and formula list.
Floating Toolbars
Floating toolbars appear on the right side of the workspace. Each toolbar can be docked, collapsed, or dragged into a different position.
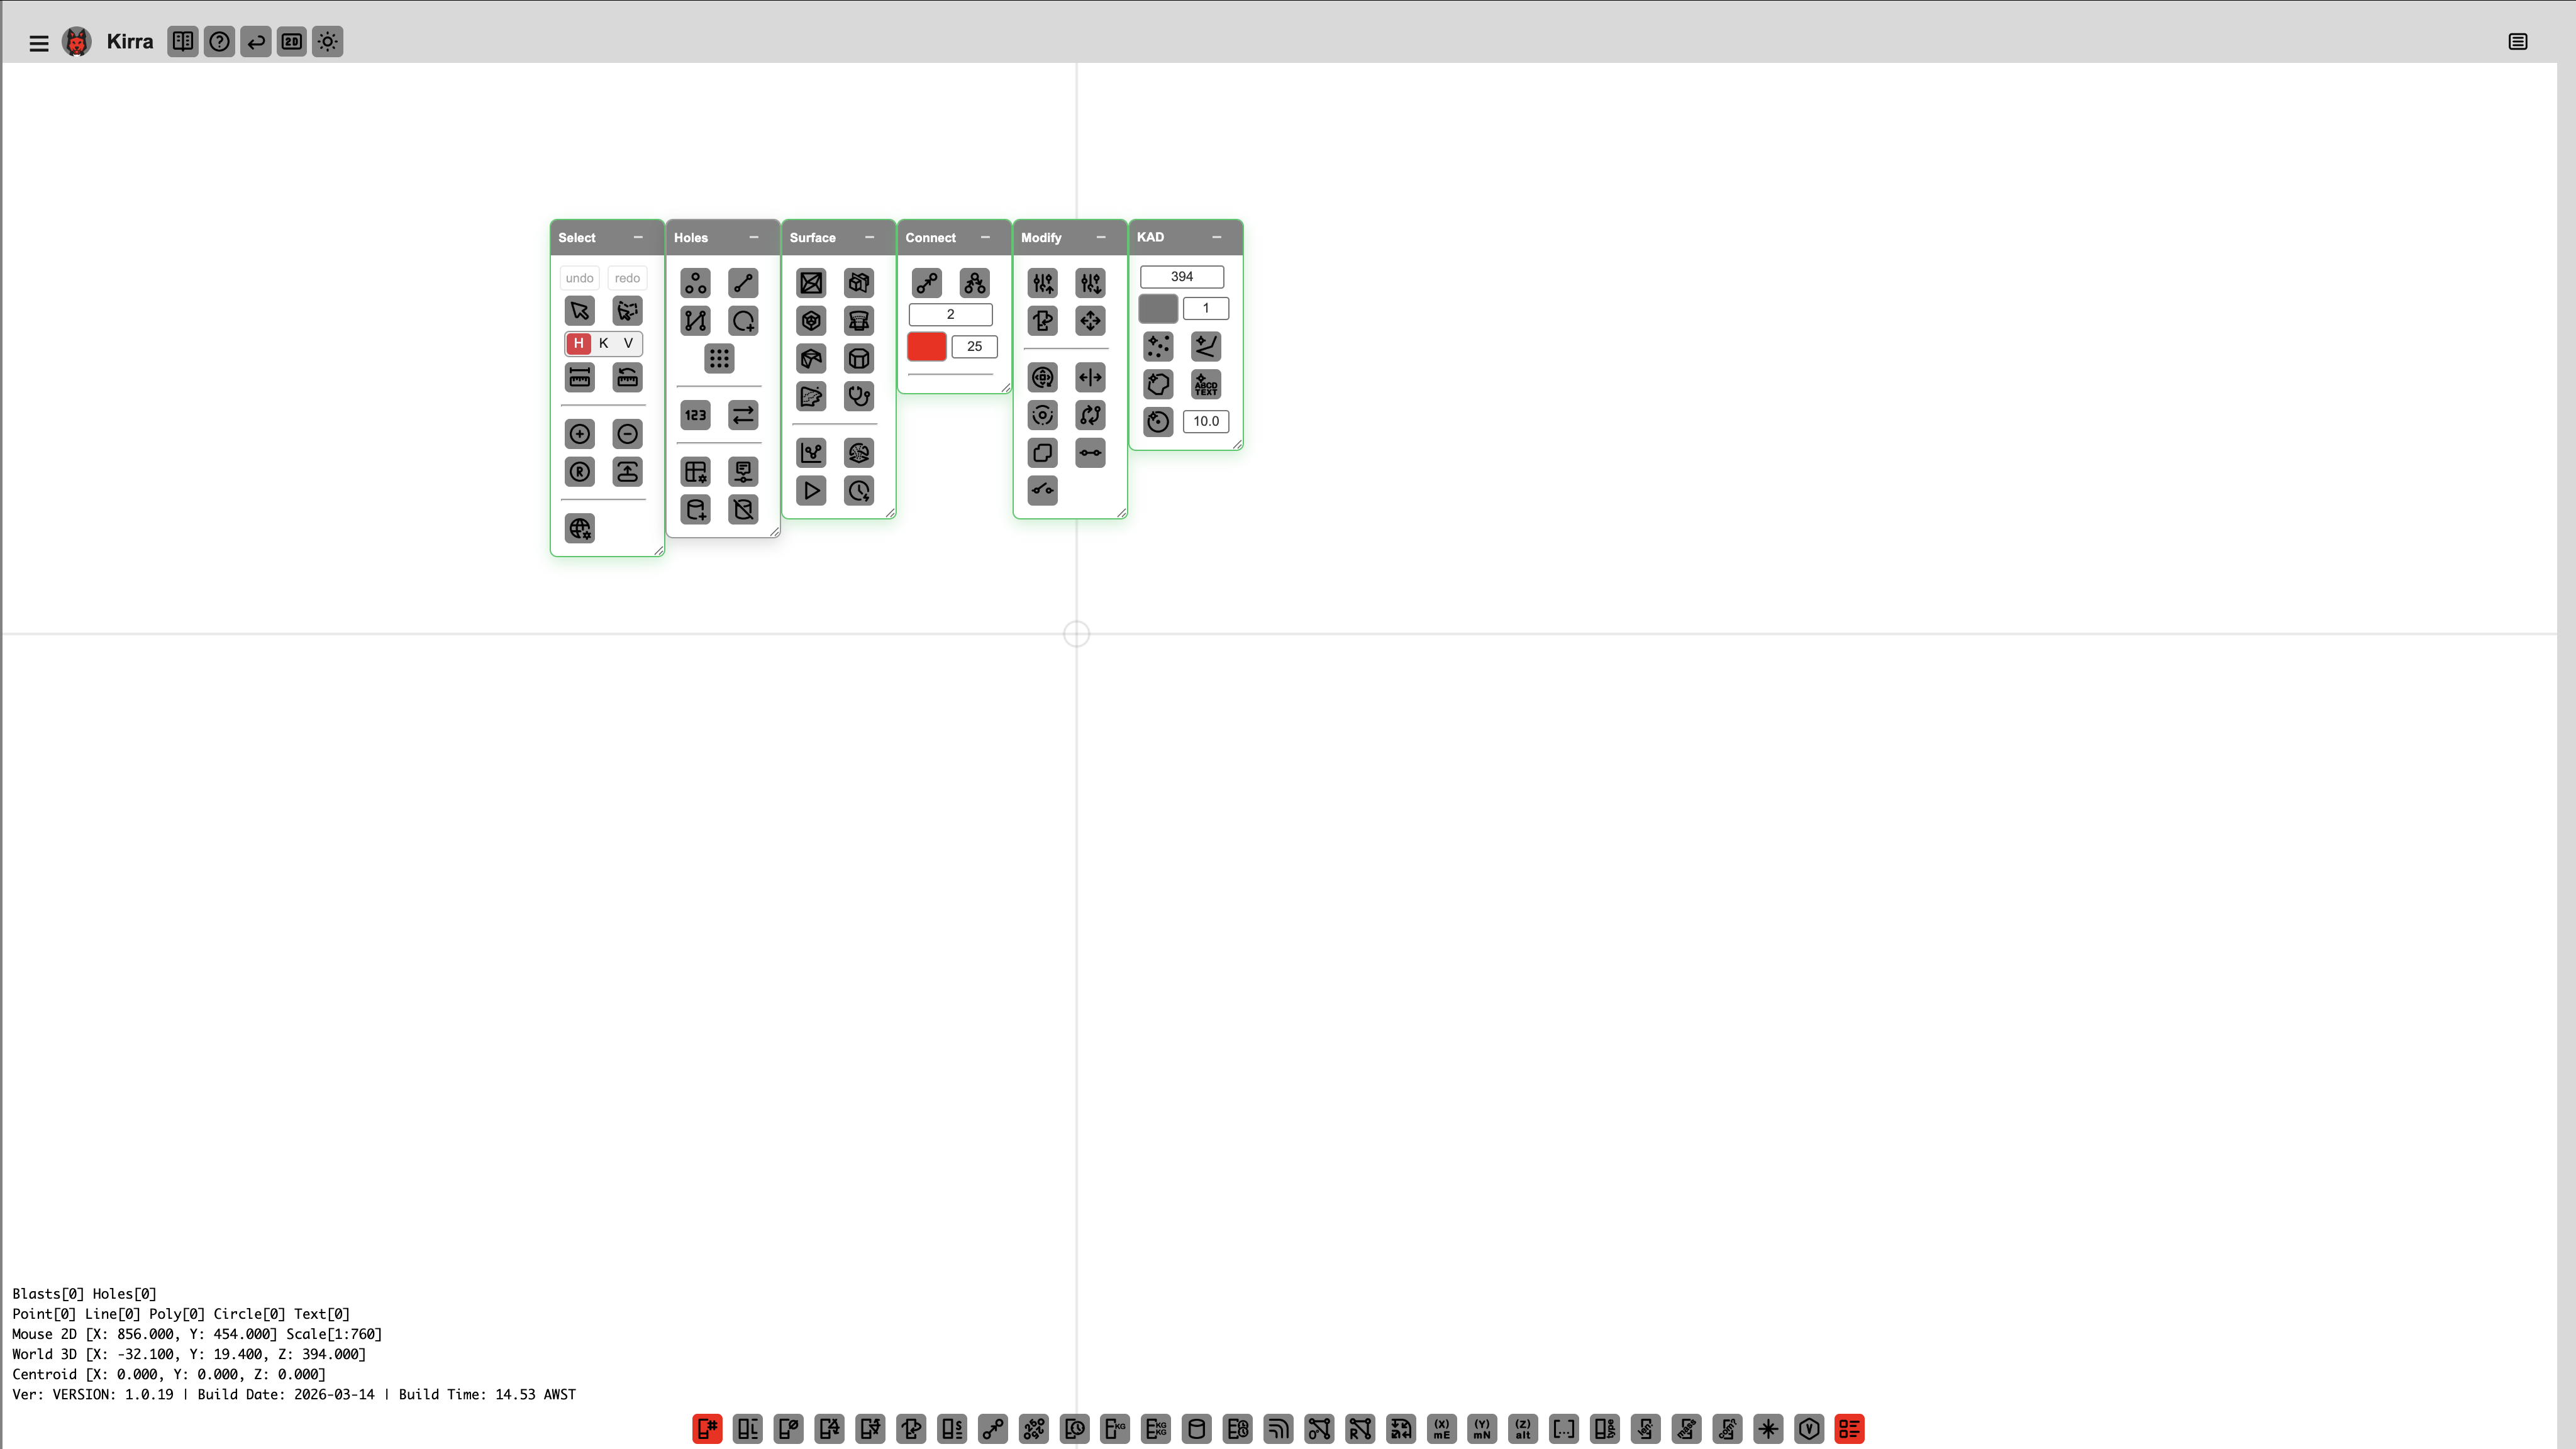 The seven floating toolbars — Select, Holes, Surface, KAD, Modify, Connect, and Analyse.
Each toolbar minimises to its title bar via the − button in its header.
Dockview Panels
Kirra uses Dockview for resizable, dockable, and pop-out panels.
| Panel | Purpose |
|---|---|
| Viewport | Main 2D canvas or 3D view — where you design and interact |
| Explorer | Data Explorer TreeView — hierarchical list of all loaded entities |
You can resize panels by dragging their edges, dock them in different positions, or pop them out into separate windows. Layout is persisted between sessions.
Data Explorer (TreeView)
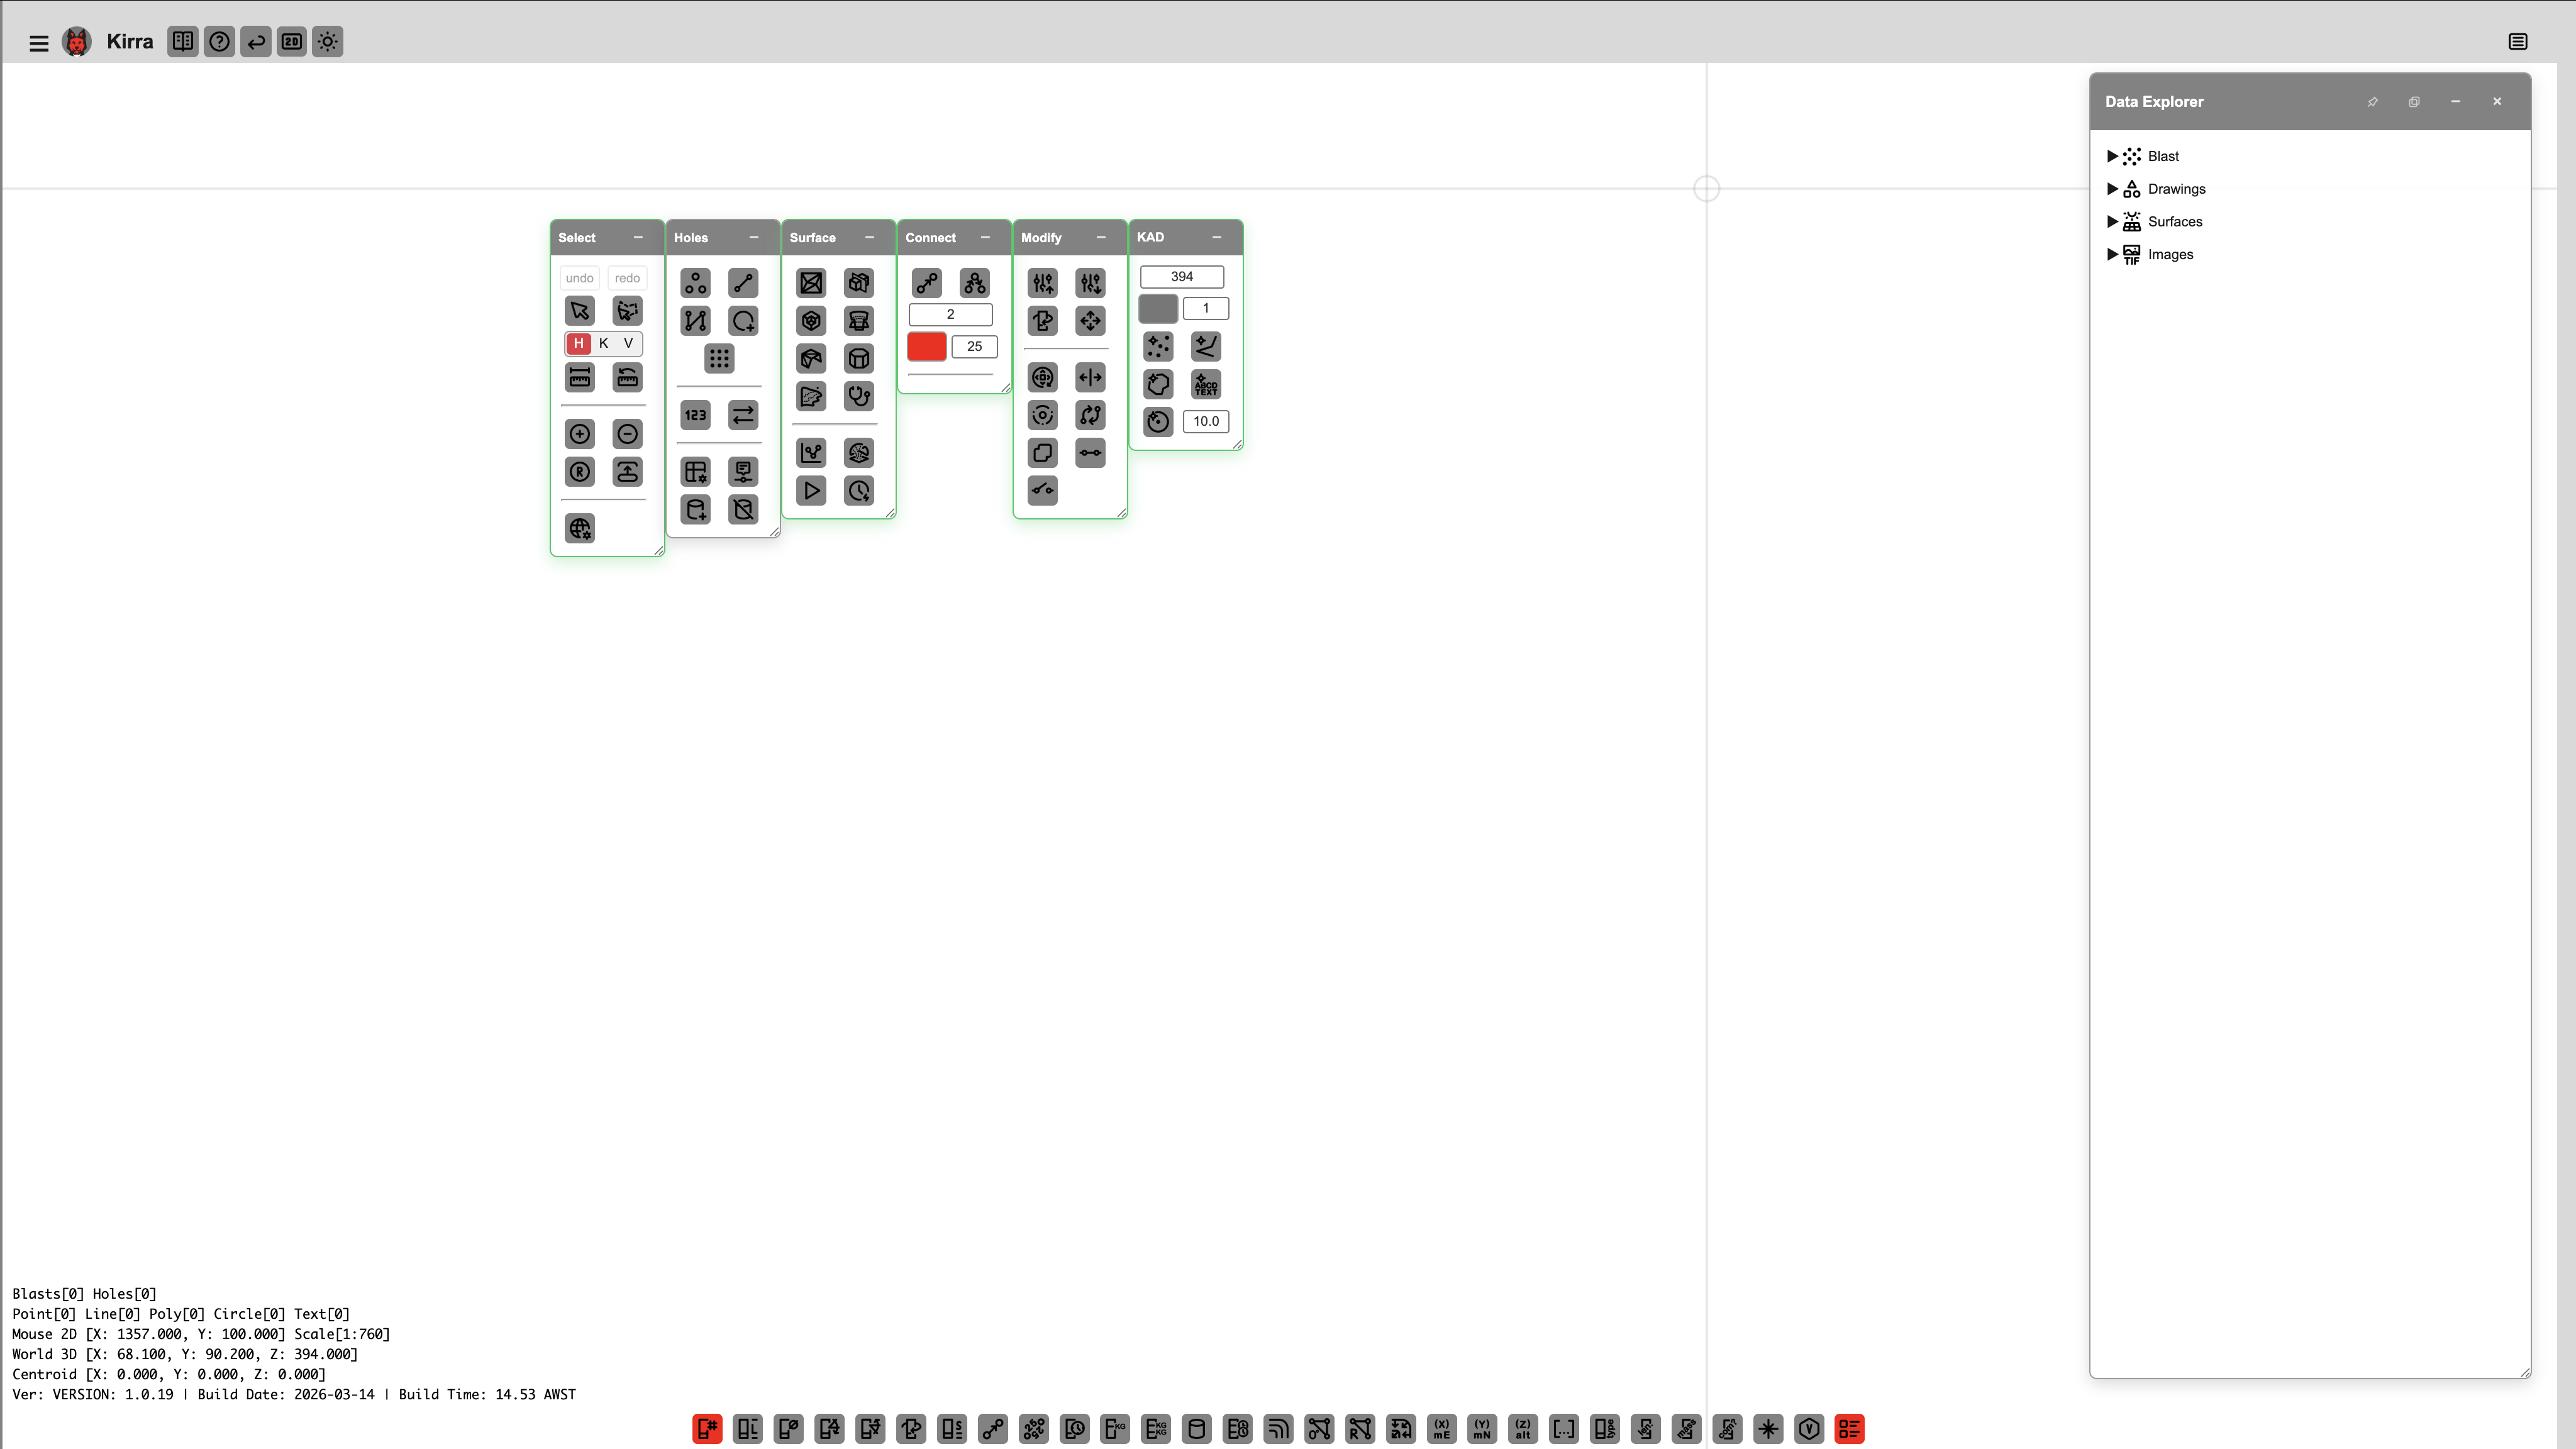 The TreeView in the Explorer panel lists all loaded entities — holes, surfaces, KAD drawings, and layers.
The TreeView is toggled by the 📑 Data Explorer button in the App Navigation Bar.
Node naming
Node IDs use a Braille separator (⣿):
| Entity type | Node ID example |
|---|---|
| Hole | hole⣿Pattern_01⣿holeID |
| KAD vertex | entityType⣿entityName⣿element⣿pointID |
TreeView features
- Visibility toggle — show or hide individual entities via the row checkbox
- Duplicate — right-click an entity to create a copy
- Context menu — right-click for statistics, move-to-layer, split/join lines, delete, and more
- Dock / popout — the TreeView can be docked to the side, popped out, or collapsed
Information Overlay
A persistent text overlay reports counts, cursor position, scene centroid, and build info.
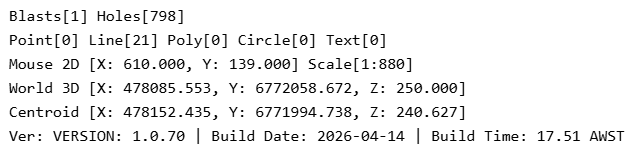 The information overlay — counts, cursor position, world position, centroid, and version/build info.
| Line | Meaning |
|---|---|
Blasts[N] Holes[M] |
Number of blasts and total holes loaded |
Point[N] Line[N] Poly[N] Circle[N] Text[N] |
KAD entity counts by type |
Mouse 2D [X, Y, Scale] |
Cursor position in 2D paper-space units and current scale |
World 3D [X, Y, Z] |
Cursor position in world coordinates (m) |
Centroid [X, Y, Z] |
Scene centroid in world coordinates |
Ver: VERSION ... |
App version, build date, build time |
The overlay is rendered as plain text and stays visible while you work.
2D Canvas
The main 2D viewport shows your blast pattern in plan view.
| Action | How |
|---|---|
| Pan | Default mode — click and drag (or middle-mouse drag) |
| Zoom | Scroll wheel (direction set in 3D World Settings) |
| Select holes | Left-click on a hole (active H/K/V mode applies) |
| Multi-select | Shift+click to add or remove from selection |
| Polygon select | Activate the Polygon Selection tool in the Select Toolbar |
3D View
Switch to 3D with the 2D / 3D toggle in the App Navigation Bar.
| Action | How |
|---|---|
| Pan | Click and drag (default mode) |
| Orbit | Alt + drag |
| Camera roll | Alt + Shift + drag |
| Zoom | Scroll wheel (zooms towards cursor when Cursor Zoom is on) |
| Context menu | Right-click |
The 3D view uses the same coordinate space as 2D — no Z scaling or elevation transform.
Orbit Focus
The Orbit Focus tool (in the Select Toolbar) lets you click any point in the 3D scene to set it as the new orbit centre. See 3D View & Orbit Focus for full details.
3D World Settings
The 3D World Settings button (in the Select Toolbar) opens renderer configuration — camera damping, cursor zoom, scroll-wheel direction, plumb-line display, lighting, axis lock, gizmo display, and text billboarding. See Select Toolbar — 3D World Settings.
Theme and Language
- Theme toggle — Switch between dark and light mode (App Navigation Bar, far right)
- Language selector — Choose from English, Chinese, French, Mongolian, Russian, Spanish, and more [VERIFY: where in the UI — App Navigation panel or hamburger menu]
Related topics
- Select Toolbar — undo/redo, selection, measurement, view
- Holes Toolbar — hole placement and pattern generation
- Surfaces Toolbar — triangulation, boolean, mesh repair
- KAD Toolbar — vector drawing
- Modify Toolbar — transform, offset, boolean, join, split
- Connect Toolbar — surface connectors, electronic timing
- Analyse Toolbar — analytics and timing analysis
- Supported File Formats — full import / export matrix
- Keyboard Shortcuts
Next: Your First Blast →