kirra-docs
KAD Toolbar
The KAD (Kirra App Drawing) toolbar groups the controls for drawing vector entities — points, lines, polygons, text labels, and circles — and for setting their default drawing properties. It is one of the floating toolbars on the right side of the Kirra workspace.
KAD entities are Kirra’s vector drawing layer: design boundaries, annotations, blast outlines, and input to surface operations like extrude and boolean.
Toolbar Overview
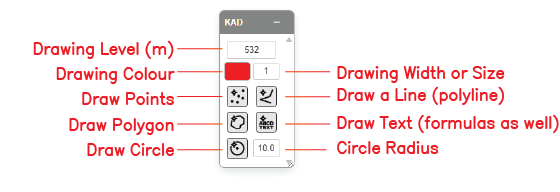 The KAD toolbar with all controls labelled.
The KAD toolbar contains the following controls:
| Control | Type | Purpose |
|---|---|---|
| Drawing Level (m) | Input | Z elevation (RL) used when placing new KAD entities |
| Drawing Colour | Picker | Colour applied to new KAD entities |
| Drawing Width or Size | Input | Line width or point/text size for new entities |
| Draw Points | Tool | Place point entities by clicking |
| Draw a Line (polyline) | Tool | Draw an open polyline |
| Draw Polygon | Tool | Draw a closed polygon |
| Draw Text (formulas as well) | Tool | Place a text label; supports fx: formulas |
| Draw Circle | Tool | Place a circle entity at the click point |
| Circle Radius | Input | Radius (m) for the next circle drawn |
Drawing Level (m)
The Z elevation (reduced level) assigned to new KAD entities. The screenshot shows 532. All vertices placed by the drawing tools take this Z unless overridden by snap-to-surface or 3D pick.
How to use
- Click the Drawing Level input
- Enter the elevation in metres
- New entities are placed at this Z until you change it
Note: Existing entities are not affected when you change the Drawing Level. Only newly placed vertices use the new value.
Drawing Colour
The colour applied to new KAD entities. The picker swatch shows the current colour.
How to use
- Click the colour swatch
- Pick a colour
- New points, lines, polygons, text, and circles use this colour until changed
Drawing Width or Size
A single field that controls the line width for lines and polygons, and the size for points and text. The screenshot shows 1.
How to use
- Click the field and enter a numeric value
- For lines / polygons: width in pixels [VERIFY: pixel vs metre units]
- For points / text: relative size [VERIFY: exact unit/range]
Draw Points
Places individual point entities at click positions.
How to use
- Click the Draw Points button on the KAD toolbar
- Click on the canvas to place a point
- Each click creates a new point entity at the current Drawing Level
- Press
Escapeor change tool to finish
Draw a Line (polyline)
Draws an open polyline — a chain of connected vertices.
How to use
- Click the Draw a Line (polyline) button on the KAD toolbar
- Click to place vertices in sequence
- Press
Backspace(orDelete) to undo the last vertex - Press
Escape(or double-click) to finish the line
Notes
- Lines are open — they do not close back to the first vertex
- Use Draw Polygon if you need a closed boundary
- Existing lines can be joined with the Join KAD Lines tool in the Modify toolbar
Draw Polygon
Draws a closed polygon — like a line, but the last vertex connects back to the first.
How to use
- Click the Draw Polygon button on the KAD toolbar
- Click to place vertices
- Press
Backspace(orDelete) to undo the last vertex - Press
Escape(or double-click) to close the polygon
Notes
- Polygons are auto-closed — you do not need to click on the first vertex
- Polygons feed Extrude, KAD Boolean, and Radii operations
Draw Text (formulas as well)
Places a text label at a click point. Text accepts plain strings and fx: formulas evaluated against hole / pattern data.
How to use
- Click the Draw Text (formulas as well) button on the KAD toolbar
- Click on the canvas to place the text anchor
- Enter the text in the input that appears
- Press
Enterto commit
Formulas
Text starting with fx: is evaluated as a formula. Example:
| Formula | Result |
|---|---|
fx: holeName |
The hole’s name |
fx: holeDiameter |
The hole diameter |
fx: sdobStem() |
Stemming length from Scaled Depth of Burial |
fx: ppvKG() |
Maximum Instantaneous Charge |
See the Charge Code formula reference [VERIFY: link target — page may live in Charging or KAD] for the full list of variables and helper functions.
Draw Circle
Places a circle entity centred on the click point, with radius set by the Circle Radius input.
How to use
- Set the radius in Circle Radius (see below)
- Click the Draw Circle button on the KAD toolbar
- Click on the canvas to place the circle centre
- Each click creates a new circle at the current radius
Notes
- Circles are first-class KAD entities — they survive save/load and export to DXF
- For circular polygons around holes (with control over vertex count and starburst), use Radii in the Modify toolbar instead
Circle Radius
The radius (in metres) used by the next circle drawn. The screenshot shows 10.0.
How to use
- Click the Circle Radius input
- Enter the radius in metres
- The next click of Draw Circle uses this radius
Related topics
- Drawing Points, Lines, and Polygons — extended drawing guide with snapping and editing
- Modify Toolbar — transform, offset, radii, boolean, join, split
- Extrude, Boolean, and Section Plane — 3D operations on KAD entities
- Select Toolbar — selection modes (H / K / V) for KAD
- Interface Tour — workspace overview